
When the Martinez family decided to replace their aging central AC system in their 2,100-square-foot Denver home, they initially planned three separate single-zone mini-splits—one for the main floor, one for the master bedroom, and one for the two kids' rooms upstairs. Their quote came to $6,300 DIY ($1,899 per zone plus $600 for a fourth outdoor unit location). Then their contractor mentioned multi-zone systems: one outdoor unit serving all four zones for $5,850 total—a $450 savings with cleaner aesthetics (one outdoor unit instead of three).
The Martinez family chose Zone Air's quad-zone system and discovered benefits beyond initial cost savings. Their master bedroom needs 68°F for sleep while their teenagers prefer 72°F. The main floor requires aggressive cooling during sunny afternoons but minimal heating overnight. The multi-zone setup delivered independent control for each space—impossible with their old central system's single thermostat. Their first summer cooling costs ran $165 monthly versus $285 with their old central AC, saving $120 monthly through zoned control that only conditions occupied spaces.
Eighteen months later, they appreciate the decision more than ever. When their daughter goes to college, they simply turn off her zone entirely, eliminating wasted cooling and heating for an unused 180-square-foot bedroom. That flexibility saves an estimated $25-35 monthly, adding $300-420 annually to their already-substantial savings. Their multi-zone investment paid for itself in approximately 14 months through combined equipment savings and efficiency gains.
This comprehensive guide explains how to design, size, install, and optimize multi-zone mini-split systems, revealing when they deliver superior value versus multiple single-zone systems and how to avoid common configuration mistakes that waste money.
What is a Multi-Zone Mini-Split System?
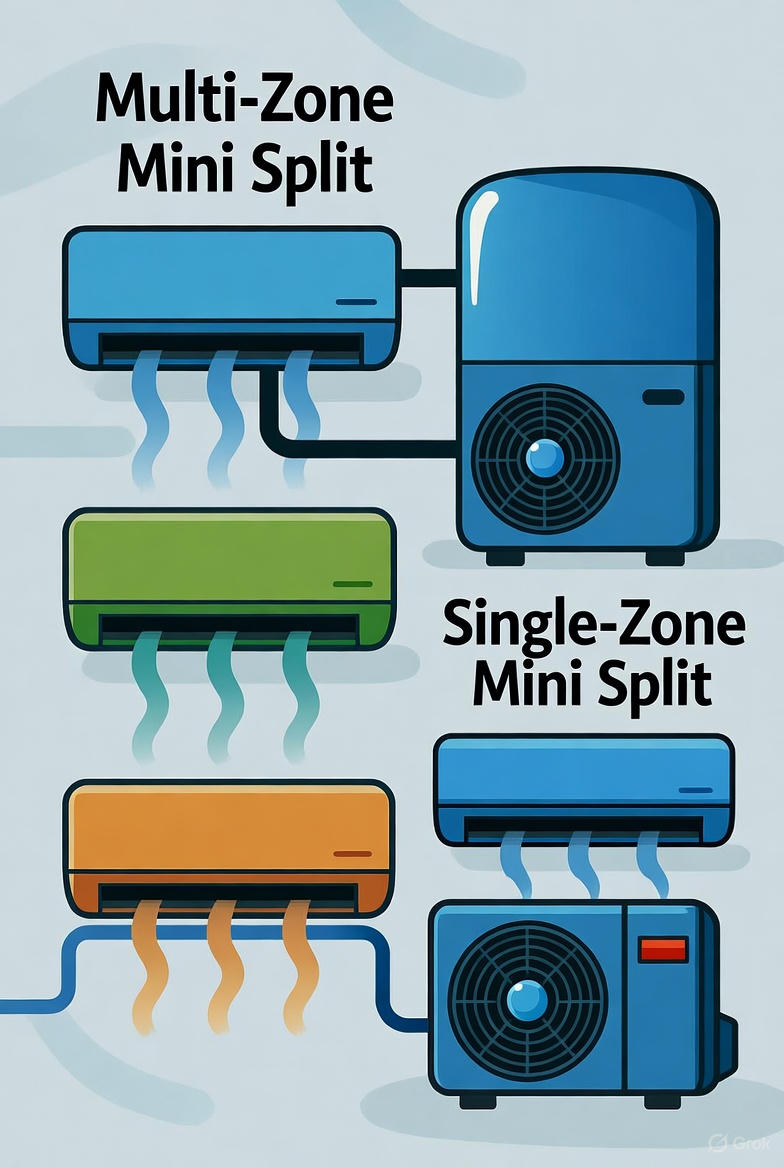
A multi-zone mini-split system consists of one outdoor condenser unit connected to multiple indoor air handlers (typically 2-5 units), allowing you to control temperature independently in different rooms or zones.
Key Components
Outdoor Condenser
- Houses compressor and condenser coil
- Available in capacities from 18,000 to 60,000+ BTU
- Supports 2-8 indoor units (model dependent)
- Single point of electrical connection
Indoor Air Handlers
- Wall-mounted, ceiling cassette, or floor units
- Individual capacity from 6,000 to 24,000 BTU
- Independent temperature and fan controls
- Various styles to match room aesthetics
Refrigerant Lines
- Connects outdoor to indoor units
- Pre-charged line sets available
- Maximum line length varies (typically 50-165 feet)
- Individual runs to each indoor unit
Control Systems
- Individual remotes for each zone
- Optional central controller
- Smart home integration available
- WiFi-enabled models
Multi-Zone System Configurations
Dual Zone (2 Indoor Units)
Typical Applications:
- Master bedroom + living room
- Two bedrooms
- Office + bedroom
- Garage workshop + bonus room
Popular Configurations:
- 18K outdoor + (9K + 9K indoor)
- 24K outdoor + (12K + 12K indoor)
- 27K outdoor + (9K + 18K indoor)
Cost Range: $2,800 - $4,500 (DIY) | $4,500 - $7,000 (installed)
Tri-Zone (3 Indoor Units)
Typical Applications:
- Three bedrooms
- Master bedroom + 2 kids' rooms
- Living room + 2 bedrooms
- Main floor + 2 upstairs rooms
Popular Configurations:
- 27K outdoor + (9K + 9K + 9K indoor)
- 36K outdoor + (12K + 12K + 12K indoor)
- 36K outdoor + (9K + 9K + 18K indoor)
Cost Range: $4,200 - $6,800 (DIY) | $6,500 - $10,000 (installed)
Quad Zone (4 Indoor Units)
Typical Applications:
- Four bedrooms
- Whole house coverage (smaller homes)
- Two-story, four-room layouts
- Commercial small offices
Popular Configurations:
- 36K outdoor + (9K + 9K + 9K + 9K indoor)
- 42K outdoor + (9K + 9K + 12K + 12K indoor)
- 48K outdoor + (12K + 12K + 12K + 12K indoor)
Cost Range: $5,500 - $8,500 (DIY) | $8,500 - $13,000 (installed)
Penta-Zone (5 Indoor Units)
Typical Applications:
- Five bedrooms
- Larger homes
- Multi-story buildings
- Small commercial spaces
Popular Configurations:
- 48K outdoor + (9K + 9K + 9K + 12K + 12K indoor)
- 54K outdoor + (9K + 9K + 12K + 12K + 12K indoor)
Cost Range: $7,000 - $11,000 (DIY) | $11,000 - $16,000 (installed)
Design Considerations
Capacity Planning
The 100% Rule Most manufacturers require total indoor capacity to be 100-130% of outdoor capacity:
Example:
- 36,000 BTU outdoor unit
- Can support: 9K + 9K + 9K + 12K = 39,000 BTU total (108%)
- Maximum typically: 42,000-48,000 BTU indoor total
Why This Matters:
- Prevents system overload
- Ensures efficient operation
- Maintains warranty coverage
- Optimizes performance
Calculation Tips:
- Size each room individually using load calculator
- Total all room requirements
- Select outdoor unit 100-130% of total
- Verify manufacturer's specific ratio requirements
Zone Configuration Strategy
Priority Zones Identify which rooms need cooling/heating most:
- Bedrooms (sleep quality priority)
- Main living areas (most occupied)
- Home offices (daily use)
- Problem rooms (poor insulation, sun exposure)
Matching Strategy Group zones by:
- Similar Usage: Bedrooms together, living areas together
- Similar Size: Equal BTU requirements
- Same Floor: Reduce line run complexity
- Thermal Similarity: South-facing vs north-facing
Common Mistakes to Avoid:
- ❌ Oversizing individual zones
- ❌ Undersizing outdoor unit for total load
- ❌ Ignoring line length limitations
- ❌ Poor indoor unit placement
- ❌ Mixing incompatible indoor unit types

Line Set Planning
Maximum Run Lengths Varies by manufacturer and model:
- Standard Systems: 50-80 feet per line
- High-Static Systems: 80-130 feet per line
- Commercial Grade: 130-165 feet per line
Total Equivalent Length Account for:
- Horizontal runs
- Vertical rises (count 2x)
- Elbows and bends (add 3-5 feet each)
Example Calculation:
- Horizontal: 40 feet
- Vertical rise: 15 feet × 2 = 30 feet equivalent
- 3 elbows × 4 feet = 12 feet
- Total equivalent: 82 feet
Planning Tips:
- Central outdoor unit location reduces total line requirements
- Minimize vertical runs when possible
- Plan line route before purchasing
- Account for obstacles and routing challenges
Electrical Requirements
Outdoor Unit:
- Dedicated 220V circuit required
- Amp rating varies by capacity:
- 18K-24K: 15-20 amp breaker
- 27K-36K: 20-30 amp breaker
- 42K-48K: 30-40 amp breaker
- 54K+: 40-50 amp breaker
Indoor Units:
- Most use low-voltage DC from outdoor unit
- Some larger units may require separate power
- Verify requirements for each model
Installation Costs:
- Electrical work: $200-800 per circuit
- Disconnect box: $40-100
- Conduit and wire: $100-400
Installation Process
Phase 1: Planning & Preparation
Week 1-2: Design Phase
- Complete load calculations for each room
- Select outdoor unit capacity
- Choose indoor unit types and locations
- Plan refrigerant line routes
- Verify electrical capacity
- Obtain permits if required
Tools & Materials Needed:
- Refrigerant line sets (individual for each zone)
- Mounting brackets for all indoor units
- Outdoor unit pad or wall mount
- Vacuum pump (6 CFM minimum)
- Manifold gauge set
- Torque wrench
- Flaring tool (if applicable)
- Core drill for wall penetrations
- Level and measuring tools
- Electrical supplies
Cost Estimate:
- Tools (if buying): $300-800
- Materials: $200-600
- Permits: $50-300 (location dependent)
Phase 2: Outdoor Unit Installation
Location Selection:
- Level surface (concrete pad recommended)
- Minimum 12" clearance all sides
- 24" clearance for service access
- Protected from direct weather exposure
- Accessible for maintenance
- Distance from bedrooms (noise consideration)
Installation Steps:
- Pour concrete pad (4" thick, 6" larger than unit)
- Wait 7 days for concrete to cure
- Install vibration dampening pads
- Set outdoor unit level
- Secure to pad with hurricane brackets
- Install electrical disconnect within sight
Common Mistakes:
- ❌ Unlevel installation (causes drainage issues)
- ❌ Insufficient service clearance
- ❌ Poor drainage around unit
- ❌ No vibration dampeners (noise transfer)
Phase 3: Indoor Unit Installation
Wall-Mounted Units:
-
Mark mounting plate position
- 7-8 feet high for optimal air distribution
- 6" from ceiling minimum
- 6" from side walls minimum
- Near outside wall for short line runs
-
Install mounting bracket
- Level is critical
- Use wall anchors for drywall
- Secure to studs when possible
- Verify weight capacity
-
Drill line set hole
- 2.5-3" diameter typically
- Slight downward angle (1/4" per foot)
- Center on planned line route
- Seal after line installation
-
Hang indoor unit
- Hook top of unit first
- Click bottom into place
- Verify secure attachment
- Check level
Ceiling Cassette Units:
- Requires 12-14" ceiling plenum
- Support framework needed
- More complex installation
- Professional installation recommended for first-timers
Floor Units:
- Similar to wall-mount process
- 4-6" from wall
- Ensure sufficient air intake clearance
- Best for rooms with limited wall space
Phase 4: Refrigerant Line Installation
For Each Zone:
-
Route Planning
- Shortest path possible
- Minimize bends and elbows
- Avoid heat sources
- Plan for proper drainage slope
-
Line Set Installation
- Keep lines straight during installation
- Avoid kinks or sharp bends
- Support every 3-4 feet
- Insulate thoroughly
-
Connection Method
- Pre-flared: Connect and tighten to torque spec
- Flare-on-site: Use proper flaring tool
- Quick-connect: Follow manufacturer procedure
- Double-check all connections
-
Insulation
- Cover all refrigerant lines
- Seal all seams with tape
- Protect from UV exposure
- No gaps in coverage
Torque Specifications:
- 1/4" line: 14-18 ft-lbs
- 3/8" line: 25-30 ft-lbs
- 1/2" line: 30-35 ft-lbs
- 5/8" line: 35-42 ft-lbs
Phase 5: Electrical Connections
Outdoor Unit:
- Install dedicated circuit at panel
- Run appropriate gauge wire to disconnect
- Install weather-proof disconnect box
- Wire outdoor unit per diagram
- Verify voltage before power-up
Indoor Units:
- Connect low-voltage control wires
- Follow color-coded wiring diagram
- Secure all connections
- Test each zone independently
Safety Critical:
- Turn off power at breaker before any electrical work
- Use proper wire gauge for amperage
- GFCI protection where required
- Ground properly
- Have electrician verify if uncertain
Phase 6: Vacuum & Test
Vacuum Process (CRITICAL):
- Connect manifold gauges to service ports
- Connect vacuum pump to center port
- Open both high and low side valves
- Run vacuum pump for 45-60 minutes minimum
- Target: 500 microns or lower
- Close valves, stop pump
- Monitor for 15 minutes (should hold vacuum)
- If pressure rises, find and fix leak
Refrigerant Release:
- Verify vacuum is stable
- Open outdoor unit service valves
- 1/4 turn with Allen wrench
- Low side first, then high side
- Open fully (count turns for future reference)
- Listen for refrigerant flow
- Monitor pressures stabilize
Initial Testing:
- Power on outdoor unit
- Turn on each indoor unit separately
- Verify cooling/heating in each zone
- Check for unusual noises or vibrations
- Verify all remotes function properly
- Test independent zone control
Operating Your Multi-Zone System
Temperature Strategy
Independent Control Benefits:
- Different temperatures per zone
- Turn off unused zones
- Adjust for sun exposure
- Personal comfort preferences
Optimal Settings:
- Occupied zones: 68-72°F (heating) / 72-76°F (cooling)
- Unoccupied zones: 65°F (heating) / 78°F (cooling) or OFF
- Nighttime: Lower in sleeping areas (65-68°F)
- Daytime: Higher in unused bedrooms (60°F winter / 80°F summer)
Energy Saving Tips:
- Only condition occupied zones
- Use setback temperatures in unused areas
- Avoid extreme temperature differentials (>10°F)
- Close doors to zoned areas
- Use programmable schedules
System Balancing
First Month: Monitor each zone's performance:
- Temperature achievement
- Runtime patterns
- Comfort levels
- Energy usage
Adjustments:
- If zone overcools: Reduce fan speed or temperature setpoint
- If zone undercools: Check for obstructions, verify BTU sizing
- If system cycles rapidly: May indicate oversizing
- If runs constantly: May indicate undersizing
Maintenance Schedule
Monthly:
- Clean or replace indoor unit filters
- Check condensate drainage
- Verify all zones operating properly
- Clean outdoor unit exterior
Quarterly:
- Deep clean filters
- Inspect refrigerant lines for damage
- Check electrical connections
- Verify outdoor unit clearances
Annually:
- Professional system inspection
- Refrigerant pressure check
- Clean indoor coils
- Clean outdoor coils
- Check all electrical connections
- Verify proper drainage
Every 2-3 Years:
- Professional deep cleaning
- Coil chemical treatment
- Comprehensive system test
Cost Analysis
Equipment Costs (DIY)
Dual Zone Systems:
- Budget: $2,800-3,500
- Mid-Range: $3,500-4,200
- Premium: $4,200-5,000
Tri-Zone Systems:
- Budget: $4,200-5,200
- Mid-Range: $5,200-6,200
- Premium: $6,200-7,500
Quad Zone Systems:
- Budget: $5,500-6,800
- Mid-Range: $6,800-8,000
- Premium: $8,000-10,000
Zone's Multi-Zone Pricing: Professional-grade equipment at mid-tier prices. View current systems
Installation Costs (Professional)
Labor Rates:
- Dual Zone: $1,500-2,500
- Tri-Zone: $2,200-3,500
- Quad Zone: $3,000-4,500
- Penta-Zone: $3,500-5,500
Additional Costs:
- Electrical work: $200-800
- Line set extensions: $150-400 per zone
- Concrete pad: $150-400
- Permits: $50-300
- Crane/lift rental (difficult access): $300-800
Operating Costs
Average Monthly Costs (Total System):
- Dual Zone (running both): $45-85
- Tri-Zone (running all): $70-130
- Quad Zone (running all): $90-170
Cost Savings vs. Central Air:
- 30-40% lower when zoning efficiently
- 50-60% lower when cooling select zones only
- No duct losses (25-30% savings)
Example Scenario:
- 2,000 sq ft home
- Quad zone system
- Cooling only 2 occupied zones: $50/month
- Central air cooling whole house: $140/month
- Savings: $90/month ($1,080/year)
Troubleshooting Common Issues
Zone Not Cooling/Heating
Check:
- Indoor unit powered on?
- Filter clean?
- Mode set correctly (cool/heat)?
- Setpoint appropriate?
- Outdoor unit running?
Solutions:
- Reset indoor unit (power cycle)
- Clean filter
- Check circuit breakers
- Verify remote batteries
- Inspect for error codes
Uneven Cooling Between Zones
Causes:
- Improperly sized zones
- Line length differences
- Airflow obstructions
- Different solar loads
Solutions:
- Adjust fan speeds individually
- Use lower setpoints in harder-to-cool zones
- Improve insulation in problem zones
- Close doors to maintain zone isolation
System Short Cycling
Causes:
- Oversized for actual load
- Dirty filters
- Refrigerant issues
- Thermostat placement
Solutions:
- Clean all filters
- Verify proper refrigerant charge
- Adjust setpoints
- Reduce fan speeds
- Contact professional if persists
High Energy Bills
Check:
- All zones running when not needed?
- Doors/windows left open?
- Filters clean?
- Correct operating modes?
Solutions:
- Turn off zones in unused rooms
- Use setback temperatures
- Regular maintenance
- Improve home insulation
Multi-Zone vs. Single Zone Systems
When Multi-Zone Makes Sense
Best Applications:
- Multiple rooms needing coverage (3+ rooms)
- Desire for independent control
- Limited outdoor space
- Single electrical circuit preference
- Aesthetic preference (one outdoor unit)
Advantages:
- Independent temperature control
- Single outdoor unit (cleaner look)
- One electrical connection
- Potential cost savings vs. multiple singles
- Easier permitting (often)
Disadvantages:
- More complex installation
- Single point of failure (outdoor unit)
- More expensive upfront than equivalent single zones
- Harder to expand later
When Multiple Single Zones Make Sense
Best Applications:
- Rooms added over time
- Very large spaces
- Phased installations
- Backup/redundancy desired
Advantages:
- Simpler installation (per unit)
- Redundancy (one failure doesn't affect all)
- Easier expansion
- More flexible sizing
- Lower initial cost (per zone)
Disadvantages:
- Multiple outdoor units (visual impact)
- Multiple electrical circuits needed
- More maintenance points
- Takes more exterior space
Zone Multi-Zone Systems
Why Choose Zone:
- Professional-grade components
- Competitive multi-zone pricing
- Pre-matched systems (eliminate compatibility issues)
- Complete installation kits included
- Expert technical support
- Industry-leading 10-year warranty
Current Multi-Zone Offerings:
- 18K Dual Zone: Starting at $2,899
- 27K Tri-Zone: Starting at $4,299
- 36K Quad Zone: Starting at $5,699
- Custom configurations available
Includes:
- Outdoor condenser unit
- All indoor air handlers
- Pre-charged line sets
- Installation brackets
- Wireless remotes
- Full warranty coverage
View Multi-Zone Systems or call (801) 882-2324 for custom configuration assistance.
Frequently Asked Questions
Can I add zones later to my multi-zone system? Only if your outdoor unit has unused ports and sufficient capacity. Plan for future expansion during initial purchase.
What happens if one zone fails? Other zones continue operating normally. Failed zone can be repaired independently.
Can I mix different indoor unit types? Yes! Most systems support combinations of wall-mounted, ceiling cassette, and floor units.
Do all zones need to run simultaneously? No. Each zone operates independently. Turn off unused zones to save energy.
How long do multi-zone systems last? 15-20 years with proper maintenance. Outdoor unit typically outlasts indoor units.
Can I install a multi-zone system myself? Yes, if you're mechanically inclined and follow proper procedures. Professional installation recommended if uncomfortable with refrigeration work.
What size outdoor unit do I need? Calculate BTU requirements for each room, add them up, then select outdoor unit rated for 100-130% of total.
Is a multi-zone system cheaper than multiple single-zone systems?
Multi-zone systems typically cost 15-30% less than equivalent multiple single-zone systems when conditioning 3+ rooms, though the savings vary by configuration. The Martinez family saved $450 upfront (quad-zone at $5,850 versus four single zones at $6,300), plus ongoing installation simplicity. A tri-zone system costs $4,200-6,800 DIY versus $5,400-7,200 for three separate single zones—savings of $1,200-400. Quad-zone runs $5,500-8,500 versus $7,200-9,600 for four singles—savings of $1,700-1,100. The economics favor multi-zone because you're purchasing one outdoor unit instead of multiple, reducing equipment and installation costs. However, dual-zone systems show minimal savings ($200-400) versus two singles, making the decision more about aesthetics (one outdoor unit versus two) than cost. Installation labor savings prove substantial—one multi-zone installation versus multiple single-zone projects. The efficiency advantage comes from zoned control—condition only occupied rooms instead of entire homes, saving 20-40% on energy versus central AC or running all zones constantly.
Can I mix different BTU sizes in a multi-zone system?
Yes, mixing BTU capacities across zones represents standard practice and optimal system design. The Martinez family configured their quad-zone with 12K BTU main floor, 12K master bedroom, 9K for each kids' room—matching actual room loads rather than forcing uniform sizing. Most manufacturers support flexible combinations: a tri-zone might use 9K+9K+18K, matching two bedrooms and a large living area. The key rule: total indoor capacity must equal or slightly exceed (10-30% over) outdoor unit capacity without exceeding it significantly. A 36K outdoor unit works with 9K+9K+9K+9K (36K total, perfect match), 9K+9K+18K (36K total), or even 12K+12K+12K (36K total). Avoid configurations like 12K+12K+12K+12K (48K total) on a 36K outdoor unit—the system will throttle performance protecting itself from overload. Zone Air's multi-zone configurator helps match indoor combinations to outdoor capacity. Mixing also allows matching unit types to rooms—wall units in bedrooms, ceiling cassette in living room, floor unit in sunroom—optimizing aesthetics and airflow for each space.
What happens if one zone fails in a multi-zone system?
Individual zone failures affect only that specific zone while others continue operating normally—a key advantage over central systems where single-point failures disable entire homes. If the Martinez family's master bedroom indoor unit fails, their other three zones keep functioning. They lose climate control in one room, not the whole house. The failed zone requires repair or replacement ($800-1,500 for indoor unit replacement), but the urgency drops dramatically when the rest of the home remains comfortable. However, outdoor unit failure disables all zones simultaneously—the single-point-of-failure disadvantage of multi-zone versus multiple single-zone systems. This risk drives some buyers toward multiple single zones for redundancy. In practice, outdoor units prove more reliable than indoor units (outdoor units typically last 20-25 years versus 15-20 for indoor units), making this scenario less common. Zone Air's 10-year warranty covers both indoor and outdoor components, providing protection during the statistically-likely failure window. The probability calculation: 1 outdoor unit at 5% annual failure risk versus 4 separate outdoor units at 20% combined annual failure risk (4 × 5%) suggests multi-zone actually delivers better reliability.
Can I add more zones to my multi-zone system later?
Adding zones to existing multi-zone systems works only if your outdoor unit has unused capacity and unused refrigerant ports. A 36K outdoor unit serving two 9K zones (18K used capacity) theoretically accommodates another 18K of indoor capacity, but you must verify: does the outdoor unit have additional refrigerant line ports, and does the model support the increased zone count? Many outdoor units physically limit connections—a dual-zone-rated outdoor unit can't expand to tri-zone even with unused capacity. Check manufacturer specifications before assuming expandability. The Martinez family specified a 48K outdoor unit for their initial quad-zone installation (36K total indoor), providing unused capacity for future expansion—smart planning that proves more cost-effective than replacing undersized outdoor units later. If expansion seems likely, over-spec your initial outdoor unit and select models rated for your target zone count even if you're not installing all zones immediately. The marginal cost of a larger outdoor unit ($200-400) proves far less than replacing an undersized unit later ($1,500-2,500 for equipment plus installation labor).
Do multi-zone systems cost more to operate than single-zone systems?
Multi-zone systems operate at similar efficiency to single-zone systems when properly sized and configured, with actual operating costs depending on usage patterns rather than system type. A tri-zone running all three zones constantly costs roughly the same as three separate single-zones running constantly—both condition identical square footage using similar technology. The efficiency advantage emerges from zoned control: the Martinez family conditions only occupied spaces, running two zones during daytime (main floor + home office) and switching to three zones evening/overnight (main floor + two bedrooms), saving 25-30% versus conditioning all spaces constantly. Compare this to central AC cooling an entire 2,100-square-foot home to achieve comfort in occupied 400-square-foot spaces—multi-zone saves 40-60% versus central systems through strategic zoning. The key: actually use independent zone control. Homeowners who run all zones 24/7 forfeit efficiency advantages. Set unused zones to economy mode (78°F cooling, 62°F heating) or off entirely, conditioning only when occupied. The Martinez family saves $120 monthly versus their old central AC through disciplined zoning—turning off daughter's zone during school hours, reducing main floor conditioning overnight, and running only occupied spaces actively.
How long does it take to install a multi-zone system DIY?
DIY multi-zone installation typically requires 12-20 hours spread across 2-3 days for first-time installers, with complexity scaling by zone count and line routing challenges. A dual-zone with straightforward line runs (external walls, short distances) might complete in 8-12 hours. The Martinez family's quad-zone installation took 18 hours over three days—day one for indoor/outdoor unit mounting (6 hours), day two for line running and electrical (8 hours), day three for vacuum, startup, and testing (4 hours). The time investment compares favorably to four separate single-zone installations (8-10 hours each, 32-40 hours total), though multi-zone installation complexity increases with more zones and longer line runs. Professional installation runs $2,500-4,500 for multi-zone systems (versus $800-1,200 per single zone totaling $3,200-4,800 for four zones), making DIY attractive for mechanically-inclined homeowners. Zone Air provides comprehensive installation support including video tutorials, phone support during installation, and detailed multi-zone-specific guidance. Budget 2-3 full days for tri/quad-zone systems, recruit helpers for outdoor unit mounting (60-150 lbs), and rent proper vacuum pump equipment ($60-80 daily).
Conclusion
Multi-zone mini-split systems offer unmatched flexibility, efficiency, and control for heating and cooling multiple rooms. While more complex than single-zone systems, proper planning and installation deliver decades of comfortable, economical climate control.
Key Takeaways:
- Size each zone properly using load calculations
- Select outdoor unit for 100-130% of total indoor capacity
- Plan line routes before purchasing
- Proper vacuum procedure is critical
- Independent zone control maximizes efficiency
- Regular maintenance ensures longevity
Ready to Design Your Multi-Zone System?
- Use our load calculator to size each room
- Contact us for configuration assistance
- Browse multi-zone systems
- Read our DIY installation guide
Questions? Our team provides free design consultations: (801) 882-2324
Related Resources: