Free 3-Day Shipping on All Orders
Zone HVAC Mini Split - Professional HVAC, DIY Prices
(801) 882-2324

DIY Air Conditioner.
10 Homemade Builds + the Real DIY-Installable AC.

There are two kinds of DIY air conditioner: the homemade hack (a fan, a cooler, ice) and the actual permanent system you install yourself (a pre-charged DIY mini split). Most guides only cover one. This one covers both — 10 hack builds with honest BTU output, then when to graduate to a real DIY AC for whole-room, year-round cooling.

DIY air conditioner — homemade ice-and-fan builds plus a DIY-installable Zone Air mini split with pre-charged refrigerant lineset
10
Homemade build types
$0–$150
Hack build cost range
100–1,200
BTU range for hacks
9,000+
BTU for real DIY mini split

Two Kinds of DIY Air Conditioner

When people search "DIY air conditioner," they're usually after one of two very different things. The first is a quick build — a fan and a cooler full of ice — for a hot night, a power outage, a dorm room, a tent, or a workshop without electrical. These are real cooling devices, but they're personal-zone solutions: 100 to 1,200 effective BTUs of cooling, an hour or two of runtime per ice batch, no thermostat, no dehumidification.

The second is a permanent installation a homeowner can do themselves without an HVAC contractor. That used to mean a window AC unit; today it means a pre-charged DIY mini split. The pre-charged refrigerant lineset is the key innovation — it lets a homeowner install a real heat pump without the EPA Section 608 license, vacuum pump, and refrigerant handling that traditional split systems require. Everything else — mounting, electrical, drainage — is within reach of any handy DIYer.

How to read this guide: If you need cooling tonight or for a few days, builds #1–#10 below cover the spectrum from $0 (frozen bottles in front of a fan) to $150 (solar-powered evaporative cooler). If you want to actually solve summer cooling permanently — and probably winter heating too — skip to the real DIY air conditioner section.

10 Homemade Air Conditioner Builds

Ranked roughly by output, with honest BTU estimates and runtime. None of these replace a real AC; all of them produce real cooling for the right scenario.

#1Box Fan + Ice Tray

Cost$0–$15
Output~150–400 BTU effective
Runtime30–90 min per ice batch

Materials. Box fan, metal baking tray, frozen water bottles or ice cubes

Build. Place a metal tray of ice or frozen water bottles directly behind a box fan so the fan pulls air across the ice and pushes the chilled air into the room. Tilt the tray slightly toward the fan intake.

Reality check. The simplest DIY AC and the lowest output. Cools a 4–6 ft personal zone in front of the fan. Ice melts in 45–90 minutes; you'll burn through one freezer of ice per evening. Best as a bedside cooler, not a room solution.

#2Styrofoam Cooler + PVC Vents

Cost$25–$45
Output~400–800 BTU effective
Runtime2–4 hours per ice batch

Materials. Styrofoam cooler (40 qt+), small clip-on fan, 2–3 elbow PVC pipes (3–4 inch), block ice or frozen jugs

Build. Cut a fan-sized hole in the cooler lid for intake. Cut 2–3 holes for PVC elbow pipes as outflow vents. Mount the fan blowing down into the cooler; angle PVC elbows out at face height. Load with block ice or 2-liter frozen jugs.

Reality check. The classic Instructables build. Block ice lasts 3–5x longer than cubes. Output is real — measurable air-temperature drop of 8–15°F at the vents — but limited to a small area (10×10 ft max). Ice cost: $3–$6 per session if you're buying it.

#3Copper Coil Ice-Water Evap

Cost$40–$75
Output~500–900 BTU effective
RuntimeContinuous (5-gal water reservoir + ice)

Materials. 20–30 ft of 1/4" copper tubing, 5-gal bucket, small fountain pump, vinyl tubing, fan, ice (refilled 2–4x/day)

Build. Coil the copper tubing across the front of the fan cage and zip-tie in place. Run vinyl tubing from a fountain pump in a 5-gal bucket of ice water through the copper coil and back. Pump pushes cold water through copper, fan blows air across the cold copper.

Reality check. The most "real AC-like" output of any hack — sustained cool air for hours. Genuinely cools a small bedroom (10×12) by 5–8°F. Downside: you're refilling ice 2–4 times a day. Power draw of pump + fan: ~30 W.

#4Frozen Bottles in Front of Fan

Cost$0
Output~100–250 BTU effective
Runtime60–120 min per pair of bottles

Materials. Box fan or oscillating fan, 2–4 frozen 2-liter bottles

Build. Freeze 2-liter bottles overnight (leave 10% air for expansion). Set them in a row directly in front of the fan, on a tray to catch condensation. Fan blows past the bottles, picking up the cold.

Reality check. Lowest-effort hack on the list. Output is modest — fine for a desk fan or to take the edge off a bedroom. Bottles refreeze overnight; rotate two pairs to get continuous coverage.

#5Wet Sheet Over Fan (Egyptian Method)

Cost$0
Output~150–400 BTU effective (dry climates only)
RuntimeContinuous if sheet is re-wet hourly

Materials. Box fan, cotton sheet, water spray bottle or basin

Build. Drape a damp cotton sheet over the front of a box fan or hang it 12 inches in front. Mist the sheet every 30–60 minutes. The fan pulls air through the wet fabric — evaporation cools the air several degrees.

Reality check. Works only in dry climates (relative humidity below 50%). In humid climates, evap cooling adds to the muggy feel without dropping temperature. Free, easy, and surprisingly effective in Arizona, Nevada, New Mexico, west Texas.

#65-Gallon Bucket Swamp Cooler

Cost$30–$60
Output~600–1,200 BTU effective (dry climates)
RuntimeContinuous (water-fed, no ice)

Materials. 5-gal bucket, 6" duct fan or computer fan, fan-shroud cutout for the bucket lid, evap pads (or perforated PVC + sponges), water pump, reservoir

Build. Cut a fan-mount hole in the bucket lid. Line the bucket walls with evaporative pads or sponges. Place a small water pump at the bottom; run a hose to drip water down the pad walls. Fan on top pulls air down through wet pads, cooled air exits via 1–2 vent holes near the base.

Reality check. A real evaporative cooler in bucket form — and the only DIY build that genuinely cools an enclosed room in a dry climate. Continuous cooling as long as the reservoir has water. Solar-panel + 12V variants exist for off-grid use. Useless in humid climates.

#7Trash Can + Dryer Vent + Ice

Cost$50–$80
Output~600–1,000 BTU effective
Runtime4–8 hours per full ice load

Materials. 32-gal trash can with lid, 4–6" dryer vent hose, dryer-vent fan, large ice bags (50+ lbs)

Build. Cut a fan-mount hole in the trash can lid. Cut a vent hole in the side near the top for the dryer hose. Mount fan in the lid blowing down; load ice in the bottom. Direct the dryer-vent hose where you want cold air.

Reality check. The biggest "container" hack — holds enough ice to run for a full evening. Ducted output via the dryer hose lets you direct cold air at a couch or bed. Downside: 50+ lb of ice per session is expensive and heavy. Best for one-night events, not daily use.

#8Computer Fan + Peltier Module (12V)

Cost$25–$50
Output~150–250 BTU effective
RuntimeContinuous (line power or 12V battery)

Materials. TEC1-12706 Peltier module, 12V power supply, 2 small heatsinks, 2 computer case fans, thermal paste

Build. Sandwich the Peltier between a hot-side and cold-side heatsink (the hot side needs more cooling — bigger heatsink). Mount fans on each heatsink. Wire the Peltier to 12V (cold side faces the room). The device pumps heat from one side to the other.

Reality check. A "real" thermoelectric AC — no ice, no water, just electricity. Output is modest (good for cooling a small enclosed space — a tent, RV bunk, garden shed). Highly inefficient (about 1/4 the cooling-per-watt of a mini split). Fun build, marginal cooler.

#9Solar-Powered Evaporative Cooler

Cost$80–$150
Output~400–800 BTU effective (dry climates)
RuntimeDaylight hours (off-grid)

Materials. 12V DC fan, small solar panel (20–50 W), water pump, evap pads or wet sponges, container

Build. Variant of build #6 with a 12V fan and pump powered by a solar panel. No grid power required. Pump cycles water down evap pads; fan pulls air through.

Reality check. The best off-grid hack — runs for free during daylight hours when cooling is most needed. Dry-climate only. Best fit: detached workshops, garden sheds, off-grid cabins, garages without electrical.

#10Window AC Unit (Bought Used)

Cost$50–$200
Output5,000–8,000 BTU rated
RuntimeContinuous (wall power)

Materials. Used window AC unit (Craigslist, Facebook Marketplace), basic mounting hardware

Build. Not a hack but worth knowing. A used 5,000 BTU window unit on Marketplace runs $50–$150 in shoulder seasons. Mount per the manual; runs on standard 115V outlet.

Reality check. The honest take: if you want real AC and a "DIY" install, a used window unit beats every hack on this list on output-per-dollar. The downsides: ugly, blocks a window, only cools cooling mode (no heating), 10–12 EER vs 22–25 SEER2 on a mini split. Stop here unless you want permanent, year-round, efficient heating + cooling — that's where a DIY mini split wins.

DIY Hack vs Real DIY Mini Split

A homemade AC and a DIY-installable mini split are both "DIY air conditioners," but they solve completely different problems. The table below shows what you actually get for the price.

Homemade DIY (ice + fan)Window AC unitDIY mini split (pre-charged)
Cost$0–$150$150–$400 new$1,899–$2,599
Cooling output100–1,200 BTU5,000–12,000 BTU9,000–24,000+ BTU
Runtime1–8 hours per ice batchContinuousContinuous
Heating modeNoNo (cooling only)Yes — to -13°F outdoor
EfficiencyNot rated10–12 EER22–25 SEER2
Install time15 min – 2 hr30 min4–8 hr (single zone)
LifespanOne season5–8 years15–20 years
Best forOutage cooling, single-night use, tents, shedsRenters, one-summer usePermanent room or whole-house cooling + heating

The Real DIY Air Conditioner: Pre-Charged Mini Split

For most of the history of split-system air conditioning, "DIY install" wasn't a thing. The refrigerant circuit had to be evacuated to below 500 microns with a vacuum pump, pressure-tested with nitrogen at 500 psi, and charged with refrigerant by an EPA Section 608-certified technician. All three steps were federal requirements — homeowners legally couldn't do them.

The pre-charged refrigerant lineset changed that. Instead of an empty copper line that needs to be evacuated and charged on site, the system ships with the refrigerant already loaded in the outdoor unit and the lineset. Quick-connect couplings on each end hand-tighten and torque to spec, mating the two sealed sides without ever opening the refrigerant circuit. No vacuum pump, no nitrogen, no charging, no EPA license. The homeowner mounts the indoor and outdoor units, runs the lineset between them, connects the electrical and condensate, and the system is ready.

The 115V wall-mount models go a step further by eliminating the electrician requirement. They plug into a standard NEMA 5-15 outlet — the same circuit your microwave or hair dryer uses. For most single-room cooling needs (bedroom, home office, garage workshop, ADU, finished basement), the 9,000 BTU 115V model at $1,899 is the entry point: plug it in, mount the indoor unit, connect the lineset, done. A first-time installer finishes in 4–8 hours.

What you can DIY-install today

For background on how the underlying technology works, see the ductless heat pump guide. For a sizing breakdown by room, see what size mini split do I need. For step-by-step install instructions, see how to install a mini split.

Real DIY Air Conditioners — Pre-Charged for Homeowner Install

Three Zone Air systems cover the most common single-room and dual-room DIY install scenarios. Each ships with a pre-charged R454B lineset, free shipping, and a 7-year compressor warranty.

Browse All DIY Mini Splits

DIY Air Conditioner FAQ

Answers to the most common questions about homemade AC builds, swamp coolers, and DIY-installable mini splits.

What's the cheapest DIY air conditioner I can build?

A box fan with a tray of ice (build #1) costs $0–$15 if you already own a fan. Output is modest — enough to cool a personal zone in front of the fan, not a whole room. The next step up in price-per-cooling is the styrofoam cooler + PVC build (build #2) at around $25–$45 with measurable cooling in a small space.

Can a homemade air conditioner actually cool a room?

A small one (10×10 ft or smaller), yes — the styrofoam cooler, copper-coil, or 5-gallon bucket builds all produce real, measurable cooling. None of them cool a typical bedroom or living room the way even a small window AC does, and ice-based builds run out of cold in 1–4 hours. For a room you actually live in, a window AC unit ($50–$150 used) or a DIY-installable 9,000 BTU mini split ($1,899) is the realistic answer.

Do DIY evaporative coolers (swamp coolers) work in humid climates?

No. Evaporative cooling depends on dry air absorbing water vapor — at 50%+ relative humidity, the air can't absorb much more, so the cooler just adds humidity without dropping temperature. Evap builds (#5, #6, #9) are great in Arizona, Nevada, New Mexico, west Texas, and other arid Western states. Stick with ice-based builds (#1–#4, #7) or a real AC in the South, Midwest, Northeast, and coastal regions.

How long does the ice last in a DIY ice-based AC?

Cubed ice melts in 30–90 minutes. Block ice (frozen 2-liter bottles, large freezer blocks, or store-bought block ice) lasts 3–5 hours. The trash-can build with 50 lb of bagged ice runs 4–8 hours. If you need longer runtime, the copper-coil ice-water build (#3) re-uses melt water through a closed loop and stretches a single ice batch further.

How many BTUs does a DIY air conditioner produce?

Most DIY builds deliver between 100 and 1,200 effective BTUs, depending on design. For comparison, a small window AC is rated 5,000 BTU; a 9,000 BTU mini split delivers 9,000 rated BTU continuously. DIY builds are useful for personal cooling, sleeping, small spaces, or emergency outage cooling — but they don't replace a real AC for whole-room or whole-house comfort.

What is the most efficient DIY air conditioner?

For dry climates, a 5-gallon bucket swamp cooler (build #6) is the most efficient — continuous cooling on the wattage of a small fan and water pump (~30 W), no ice needed. For humid climates, the copper-coil ice-water build (#3) gives the most cooling-per-watt of any ice-based hack, since the closed water loop reuses cold rather than melting ice directly into the air.

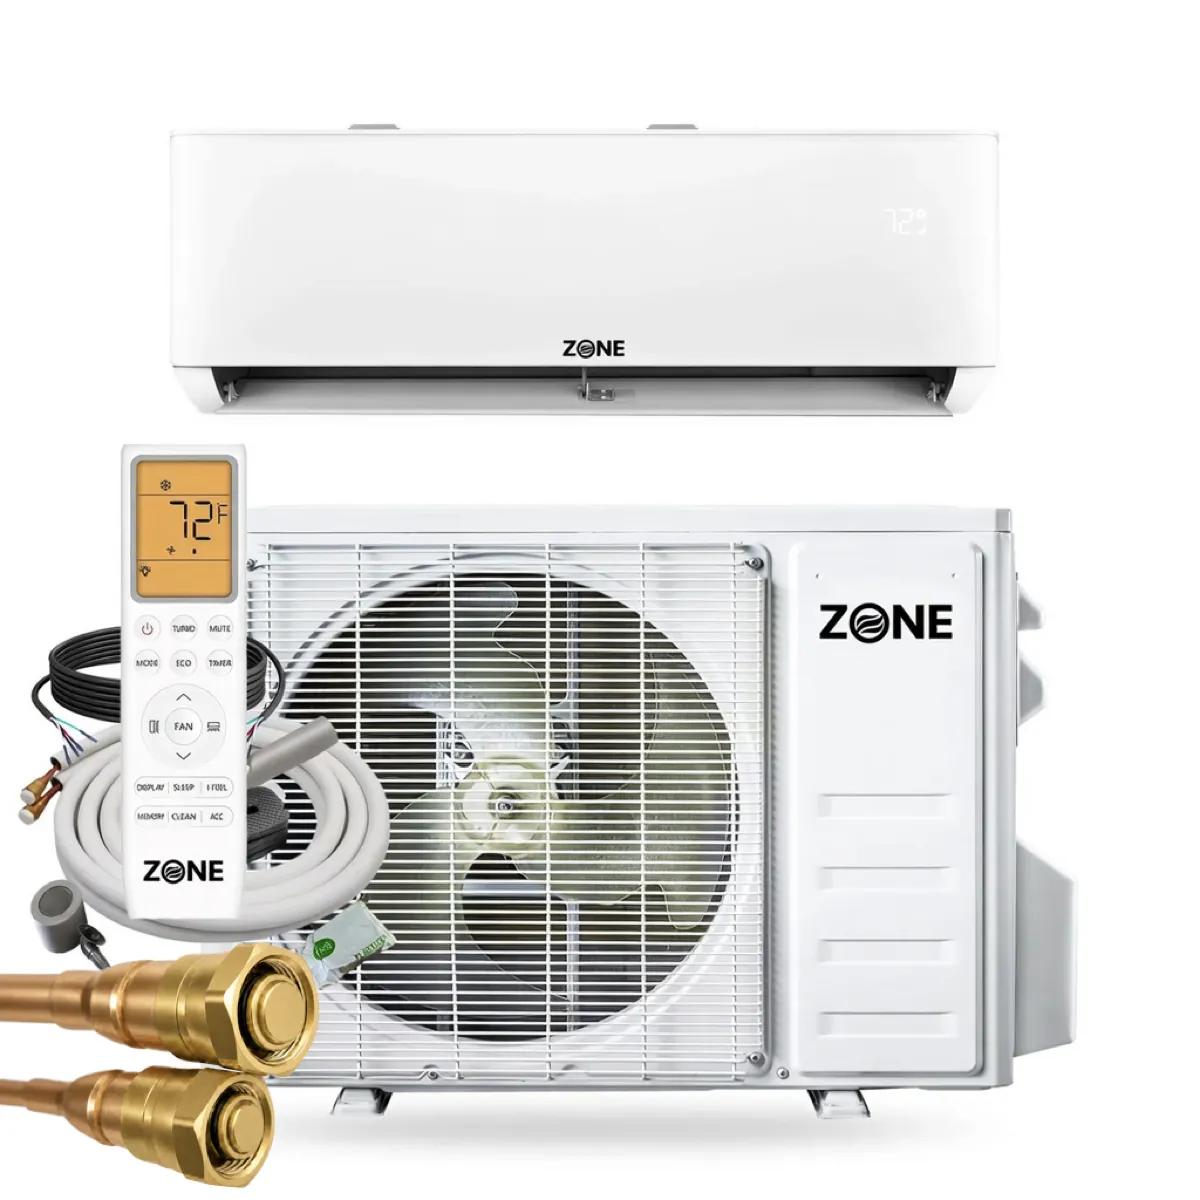
Is there a permanent DIY air conditioner I can install myself?

Yes — a pre-charged DIY mini split. Traditional split-system AC installs require an EPA Section 608-certified technician to evacuate the line set and charge the system with refrigerant. Pre-charged DIY mini splits ship with refrigerant already loaded; quick-connect couplings hand-tighten and torque to spec, so the homeowner never opens the refrigerant circuit. No EPA license, no vacuum pump. The 115V models plug into a standard outlet — no electrician either. A first-time install of a single-zone wall mount takes 4–8 hours.

Is a DIY mini split actually DIY, or do I still need a contractor?

Genuinely DIY for the mechanical install. Zone Air pre-charged systems with quick-connect linesets are designed for homeowner install with basic hand tools — no vacuum pump, no nitrogen pressure test, no refrigerant handling, no EPA certification. The electrical side depends on the model: 115V wall-mount units (9K and 12K BTU) plug into a standard 15A outlet (no electrician needed); 230V units may need a dedicated circuit ($300–$600 if you don't have one). See our step-by-step DIY install guide.

Window AC vs DIY mini split — which is the better DIY choice?

For a renter or one-summer use, a window AC is cheaper and faster. For a homeowner who wants permanent cooling, year-round heating, room-by-room control, and energy efficiency, a DIY mini split wins on every metric except up-front price. Window AC: $50–$300, 10–12 EER, cooling only, blocks a window, ugly, lifespan 5–8 years. DIY mini split: $1,899–$2,599, 22–25 SEER2, heat pump heating to -13°F, no window block, lifespan 15–20 years. The math favors the mini split as soon as you keep it more than 2–3 years.

How much does a real DIY-installable air conditioner cost?

A 9,000 BTU 115V Zone Air mini split runs $1,899 — plug-and-play install, covers a 200–350 sq ft bedroom, includes the pre-charged R454B lineset. A 12,000 BTU 115V model at $2,189 covers most master bedrooms and living rooms. Compare to a contractor-installed mini split at $4,500–$6,000 (equipment + labor) or a central AC retrofit at $8,000–$15,000. The DIY savings come from skipping the $1,500–$3,000 install labor — which is what the pre-charged lineset and quick-connects are designed to enable.

Related Guides

Ready for the Real DIY Air Conditioner?

Pre-charged mini splits, plug-and-play 115V models, dual-zone and multi-zone bundles. The homeowner-installable AC that actually replaces a window unit — and adds heat pump heating to -13°F.

Shop DIY Mini Splits