True DIY Mini Split, No Vacuum: 2026 Easy Install Pre-Charged Systems
A true DIY mini split with a no vacuum install sounds too good to be true, but in 2026 it’s a reality. How easy the install actually is depends on which brand and system you pick. This guide breaks down which mini split systems actually skip the vacuum pump, which ones can’t, and how to choose the right unit for your house.
Summary: Zone Air pairs a true no-vacuum, no-pro-required DIY heat pump install with the highest published efficiency in the category — up to 24 SEER2, pre-charged R-454B line sets, and cold-climate heating down to -13°F.
Not sure what size you need? Size your unit here.
Ready to shop?
View DIY Systems →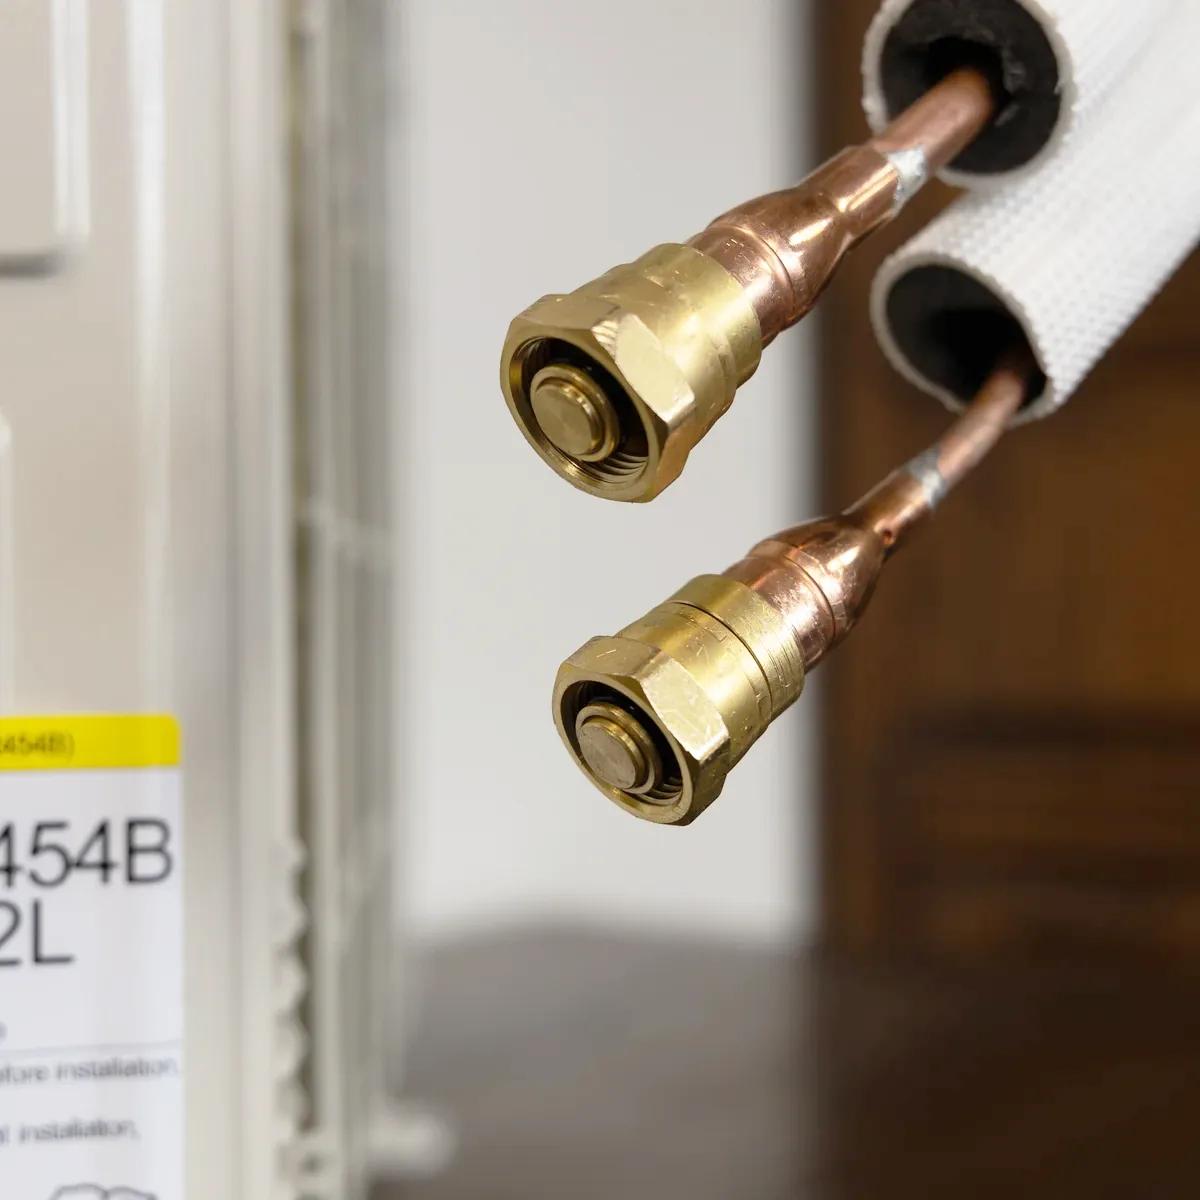
Quick Answer: Can You Install a True DIY Mini Split With No Vacuum?
Yes, but only with a factory pre-charged system using sealed quick-connect fittings. With a genuine pre-charged line set, the refrigerant circuit stays sealed from factory to startup, so no deep vacuum, manifold gauge, micron gauge, or EPA 608 license is needed. Pre-charged DIY systems eliminate the vacuum pump entirely — there is nothing to evacuate, because the lines never open to air.
A standard 12k–24k BTU Mitsubishi, Daikin, or Pioneer mini split system still requires pulling a deep vacuum on the line set before startup, and handling refrigerant requires EPA 608 certification. The distinction is simple: pre-charged DIY (Zone Air) = no vacuum; traditional flare (Mitsubishi, Daikin, Fujitsu, Pioneer) = vacuum required.
Zone Air is a modern, high-efficiency example — offering SEER2 up to 24 with pre-charged R-454B line sets and cold-climate heating down to -13°F. Skipping the vacuum on a non–pre-charged line set is never “true DIY.” It’s a shortcut that risks compressor failure and warranty denial, because air and moisture in a standard flare-fitting mini split damage the compressor and lower efficiency.
What “True DIY Mini Split No Vacuum” Really Means
A true DIY mini split is a mini split system engineered so homeowners install it without handling raw refrigerant or pulling a vacuum. The key component is the pre-charged line set: copper tubing that leaves the factory already evacuated, sealed, and filled with the exact refrigerant charge for a fixed length — for example, 16 ft on standard Zone Air kits.
Quick-connect fittings between the outdoor unit and indoor head act as valves, opening only once fully tightened. The fittings never expose refrigerant to the atmosphere during installation. Pre-charged line sets are factory-sealed and charged, matched to each outdoor unit size (9k, 12k, 18k BTU), so the homeowner doesn’t weigh in additional refrigerant. The process is connect, torque, and go.
How Pre-Charged, Quick-Connect Mini Splits Work (Step by Step)
Here’s what a typical 12,000 BTU install looks like with a Zone Air–style system. The installation process is mounting, connecting, and powering on — no refrigerant handling required. Basic hand tools and a torque wrench cover the whole job.
Components: outdoor unit (heat pump condenser), indoor air handler, pre-charged line set sealed at both ends, control cable, and drain line.
Shipping state: the outdoor unit arrives charged with refrigerant. The line set is factory-sealed under vacuum and pre-charged. The indoor unit is sealed and dry.
Connection sequence: mount the indoor unit bracket, set the outdoor unit on a pad, route the pre-charged line set through a 3″ wall sleeve, then hand-thread and torque the quick-connect fittings at both ends. When torqued to spec (roughly 26–30 ft-lbs depending on line size — follow the spec sheet in the box), internal valves open, linking everything in one motion. At no point does the installer connect gauges or hoses to the refrigerant circuit. For the full walkthrough, read how to install a mini split.
With a traditional flare line set, the lines are open to air, must be pulled to below 500 microns with a vacuum pump, and then the outdoor unit’s service valves are opened — a completely different job.
Why Skipping a Deep Vacuum on Traditional Mini Splits Is a Bad Idea
If you’re tempted to install a traditional mini split without a vacuum pump because a YouTube comment said it’s fine — stop. Conventional mini splits require evacuation to remove air and moisture from the lines for good reason.
An un-vacuumed line set contains ambient air plus moisture that reacts with POE oil and refrigerant to form acids. Those acids eat away at compressor windings, often causing failure within 2–5 years instead of the normal 15–20 year lifespan. Trapped non-condensable gases can cut cooling capacity by 10–30% and raise energy consumption immediately.
Major traditional brands — Mitsubishi, Daikin, Fujitsu, LG, Pioneer — explicitly require evacuation in their installation manuals, and a skipped vacuum is a common reason compressor warranty claims get denied. More on this in can I install a mini split without a vacuum pump.
Zone Air’s factory-evacuated, pre-charged line sets avoid this by design. Leak checks are still essential even without a vacuum pump, but the sealed system protects you from the catastrophic stuff that happens when you skip evacuation on flare connections.
2026 Options: True No-Vacuum DIY Mini Splits Compared
Zone Air leads in efficiency with SEER2 up to 24, cold-climate heating below 0°F, pre-charged R-454B line sets (16 ft standard, 25 ft total with pre-charged extensions), a 7-year compressor warranty, 5-year parts, and a 45-day satisfaction guarantee. Because the system stays sealed end to end, there’s no professional vacuum pull to schedule and no argument later about whether it was done right.
MRCOOL DIY is the most recognized name in DIY mini splits, with flagship 5th Gen models reaching SEER2 23.6 (entry models lower), pre-charged line sets up to 50 ft on some models, and wide big-box availability. See how MRCOOL compares head-to-head with Zone Air.
Perfect Aire QuickConnect publishes SEER2 ratings around 18, with lower price points but more limited cold-climate performance — best for mild regions and tight budgets. As a rule, budget quick-connect systems run SEER2 16–19, while high-efficiency pre-charged systems reach 22–24.
All of these share the same no-vacuum concept. The differences are efficiency, warranty depth, and how much you spend on energy over time. A lower-efficiency system can waste roughly $600–$1,050 in electricity over 15 years compared to a 24 SEER2 unit, depending on your rates and runtime. Zone Air is the value pick for homeowners who care about long-term energy cost, not just the lowest sticker price.
Competitor specifications reflect manufacturers’ published data as of July 2026 and may change; verify current listings before purchasing.
Zone Air vs Traditional Flare Mini Splits: Real-World Cost and Time
The real financial decision in 2026 isn’t “vacuum pump vs no vacuum.” It’s “pre-charged DIY vs pay for a traditional flare install.”
12,000 BTU single-zone example: a Zone Air pre-charged mini split installed by a handy homeowner in an afternoon (2–4 hours of hands-on work; budget 4–8 for a first install) vs a 12k BTU traditional system installed by a contractor with $1,700–$3,700 in labor. DIY mini split systems save $3,000–$5,000 on installation costs when you factor in equipment, labor, and avoided callbacks — and $1,000–$2,000 even in the most conservative estimates.
Two-zone scenario: a homeowner adding two zones — garage plus bonus room — with Zone Air pre-charged systems avoids vacuum pump rental, manifold gauge purchase, micron gauge, EPA 608 certification, and multiple shop trips. That’s thousands of dollars saved versus hiring a contractor for a multi-zone flare, vacuum, and charge.
Pre-charged systems don’t require a vacuum pump, and pre-charged DIY mini splits like Zone Air often deliver higher SEER2 than builder-grade traditional installs, so you also save every month on the utility bill. For most homes, pre-charged DIY wins unless very long line sets force a traditional route.
Installation Overview: What You Actually Do (Without a Vacuum Pump)
About 90% of the work on a Zone Air–style mini split system is mounting, drilling, wiring, and drainage — not refrigerant handling. Expect 2–4 hours of hands-on work for a single zone; first-timers should budget 4–8.
Main steps for a 9k–12k BTU install:
- Pick the wall location, drill a 3″ hole, mount the indoor bracket
- Set the outdoor unit pad and level the unit
- Run the pre-charged line set and control cable through the wall
- Connect the quick-connect fittings and torque to spec
- Hook up power and test run
Tools needed: drill, hole saw, level, stud finder, torque wrench. No vacuum pump, no refrigerant scale, no manifold gauges, no specialty HVAC tools.
Electrical expectations: 115V models (many 9k–12k BTU units) can plug into a standard circuit, but larger 18k+ BTU or 230V models may need a dedicated breaker installed by an electrician. Electrical work for mini splits must follow local building and electrical codes. Always shut off power, follow local code, and use a properly rated disconnect at the outdoor unit. Surge protection for the outdoor unit is worth considering.
Nowhere in this process does the DIYer crack open the refrigerant circuit. All refrigerant remains inside the sealed pre-charged line and outdoor unit from factory to startup.
Limitations and When You Still Need a Vacuum (Even in 2026)
No-vacuum DIY mini splits aren’t a fit for every layout. Zone Air single-zone systems ship with a 16 ft pre-charged line set as the standard fixed length, extendable to 25 ft total with matching extension kits. Longer runs require field-charged, vacuumed lines.
Complex multi-zone setups — three to six indoor heads on one outdoor unit with 60–100 ft total line length — are usually still flare-based in 2026 and require deep vacuum and charge by an EPA 608 certified tech. Some DIYers who already own a vacuum pump and micron gauge may choose a non–pre-charged system, but only if they follow manufacturer instructions to the letter and inspect every connection.
Pre-charged line sets must not be cut or shortened unless specified by the manufacturer. If you cut, flare, or otherwise modify the pre-charged line, you immediately lose the no-vacuum advantage and must treat it like a traditional system — and a traditional install can cost $1,700–$3,700 more in that scenario.
For the typical 2026 homeowner adding 1–3 rooms or a garage within 25 ft line length, Zone Air–style pre-charged systems remain the most practical true DIY no-vacuum option.
Choosing the Right True DIY Mini Split for Your Space
Sizing matters more than brand loyalty. Use these BTU rules of thumb:
- 9,000 BTU → ~250–400 sq ft (home office, bedroom)
- 12,000 BTU → ~400–550 sq ft (bonus room, large garage)
- 18,000 BTU → ~550–800 sq ft (open living area)
Oversizing a heat pump (putting a 24,000 BTU unit in a 300 sq ft bedroom) reduces dehumidification and creates clammy, uncomfortable air. Use the sizing calculator and note your insulation quality and climate zone.
Compare true DIY systems on SEER2 rating, HSPF2, minimum outdoor temperature for heating (Zone Air handles cold climates below 0°F), noise level, and warranty terms. Then match line set length options to your actual wall-to-outdoor distance, including routing bends.
Zone Air’s ductless mini split systems are built for single-zone installs in home offices, garages, workshops, and additions where you want independent, efficient, quiet climate control without waiting for a contractor or running ductwork.
Your next step: list your room size, line set distance, and climate. Then shop Zone Air’s pre-charged systems alongside other true DIY brands on a short checklist. That’s how you make a confident purchase without second-guessing whether your system will hold up — and without ever touching a vacuum pump.
Ready to Shop?
Factory-sealed, pre-charged, quick-connect systems — the refrigerant circuit stays closed from our warehouse to your first test run. No vacuum pump, no EPA 608 license, no contractor.
Secure checkout. Fast shipping. 45-day satisfaction guarantee. 5-yr parts / 7-yr compressor warranty.